Make your own HANGING MOBILE
- naomijadetextiles

- Oct 1, 2020
- 4 min read
Updated: Oct 15, 2020
There is something about mobile's that I find very soothing, it might be flash backs to babyhood or the way they swing in the wind.
This DIY task is a fantastic escape from the day to day slog and gives your personal space some zing!
What you need:
Toilet roll tubes, as many as you like, you can always add at a later date
All your craft & art supplies, inc. paint
White paper
Ruler & measuring tape
Paper scissors or a guillotine
Double sided tape
Hole punch
Yarn or twine
A structure that works for you & how you want your mobile to hang (circle, cross, line/s)
Sandpaper (optional)
Top tips for sustainability:
A) Go foraging you can find a great stick out on your walk for the structure
B) Use as much as you can from around the home, you can keep foil to scrunch up & post it notes for block colour
C) When your in town check your Charity shops brick and brac section, sometimes they have great sparkly bits!
Before you start:
Measure the circumference and length of your tube with measuring tape. Add a 1cm allowance onto both. This will give you the height and width of the paper you need for the tube.
I prefer to measure this out on flat A4 and add another additional 1cm on the join. This way I can create freely without the worry of going over the line (I'm a child at heart!)
My tube measures 10 x 12 cm, so my space needs to be 11 x 13 cm total.
Image below shows I can just about fit 4 Art areas for 4 tubes (this is all dependant on your own tube measurements as to how many you can fit onto an A4 piece).

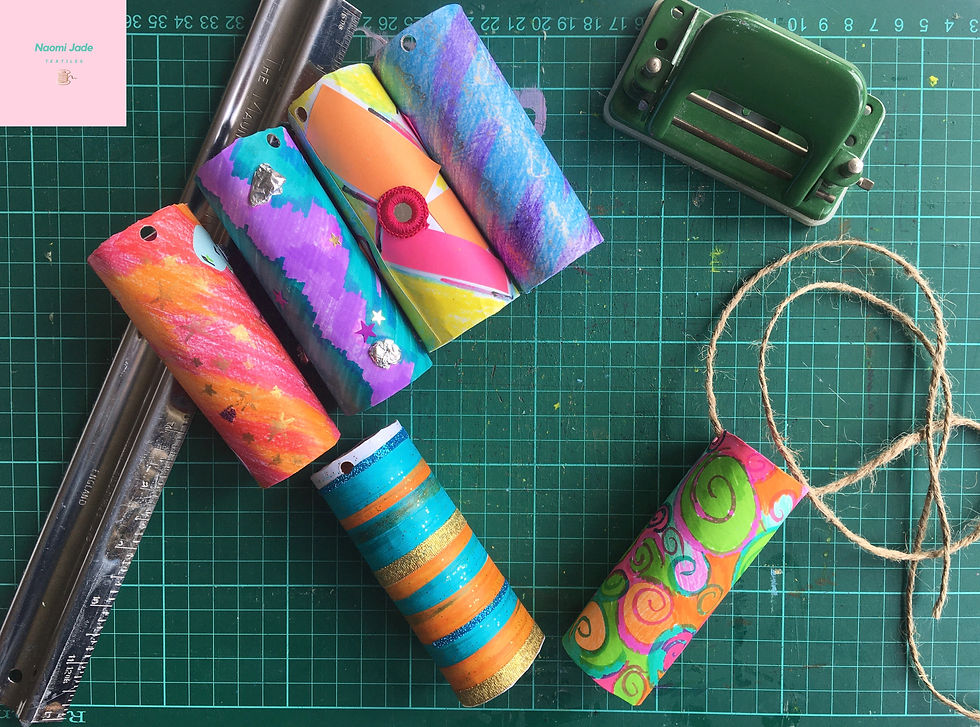
Prep your tube:
If you have a colour palette you can match up the tubes to be complimentary or treat each one as its own, whatever you choose make them a piece of Art.
When you have decided which way you want to go then paint the inside of your tubes, when you look up them you don't want to see the brown, unless of course this is in your colour palette and the aesthetic you wish to achieve then keep them natural.
I've decided to start with 6 and go from there.
Go crazy!:
Now for the FUN part, you have your templates and can go wild with your creativity.
Experiment freely and try not to think to much about the overall finished appearance! If there is a piece your not keen on you can swap this out with another, this is a fun DIY experience where its personalised.
I like to get everything out, so there are no limits
Once your tubes and pieces are dry you want to cut out each Art section. Ensure you are keeping with in the 1cm allowance.
Add double sided tape to paper on either side and ends. This will enable you to have the pieces as snug as possible.
Gently roll the tube along the edging and peel off the backing at the same time (this stops me getting tangled and sticking things when I'm not ready too!)
Ensure that you have the same amount of overlap at the ends to fold in, this will make it neater and no brown showing through on the front.
When you have all your tubes finished, use a pencil to mark out were you need to use a hole punch ready for hanging. You'll need one on each side, thread your yarn through the two points and up. Knot well to ensure no damages, here you can play with different lengths on each tube, mix it up do as you fancy.
Decide how long you wish your mobile to hang from your exhibition spot! Ceiling, off a shelf or a wall the choice is yours.
With your foraged sticks you may want to lightly sand paper some of the areas to keep it smoother.
Using twine wrap the X tightly in the centre, you can sticky tape it down to keep secure while you wrap around. When they are secure you want the twine to continue up to the length of hanging, and then back down and under. If you wish to use another structure shape ensure that there is a centre point for it to hang from.
When coming back up you want to wrap in and out of the last length. This will enforce it, you can do this as many times as you see fit.
Evenly distribute your tubes across the mobile frame to make sure its level when hanging, tie these tightly around the selected point.
Check out 'DIY POM POM WREATH' to find out how to make Pom's to add to your mobile!
Thread these through with a needle on to the same thread as the tube, and or on separate yarn. You can use the same yarn thats used to tie round the pom. This way it is less bulky to hang, just make sure you cut enough off before.
Now hang your new Art bebe somewhere you can appreciate her always!
Craft shouldn't be an occasion it should be everyday.
Please do share your creations on Instagram with the hashtag #threadysteadycraft
I love to see what you have made, it makes me do a happy dance!

All images are owned by Naomi Jade Textiles, if you would like to use them you are welcome to but please do tag and mention us in your post. Thank you xx


Comments